
'A Bulwark Against Darkness' quest walkthrough in The Blood of Dawnwalker
How to get the Arbiter's Armor in The Blood of Dawnwalker
The "A Bulwark Against Darkness" quest in The Blood of Dawnwalker will leave you with a shiny new heavy legendary armor set. Of course, in Coen's world, things are never easy; to obtain the Arbiter's Armor, you must collect four incredibly rare components. Since you won't get more than a few vague hints about their location, it can easily take hours to complete the Arbiter Armor set…
To spare you that pain, here's how to get the Arbiter Armor set in The Blood of Dawnwalker's "A Bulwark Against Darkness" quest.
[Ed. note: This guide contains spoilers for The Blood of Dawnwalker, so continue at your own risk! Feel free to follow along or bookmark this page and come back if you get stuck.]
'A Bulwark Against Darkness' quest walkthrough in The Blood of Dawnwalker
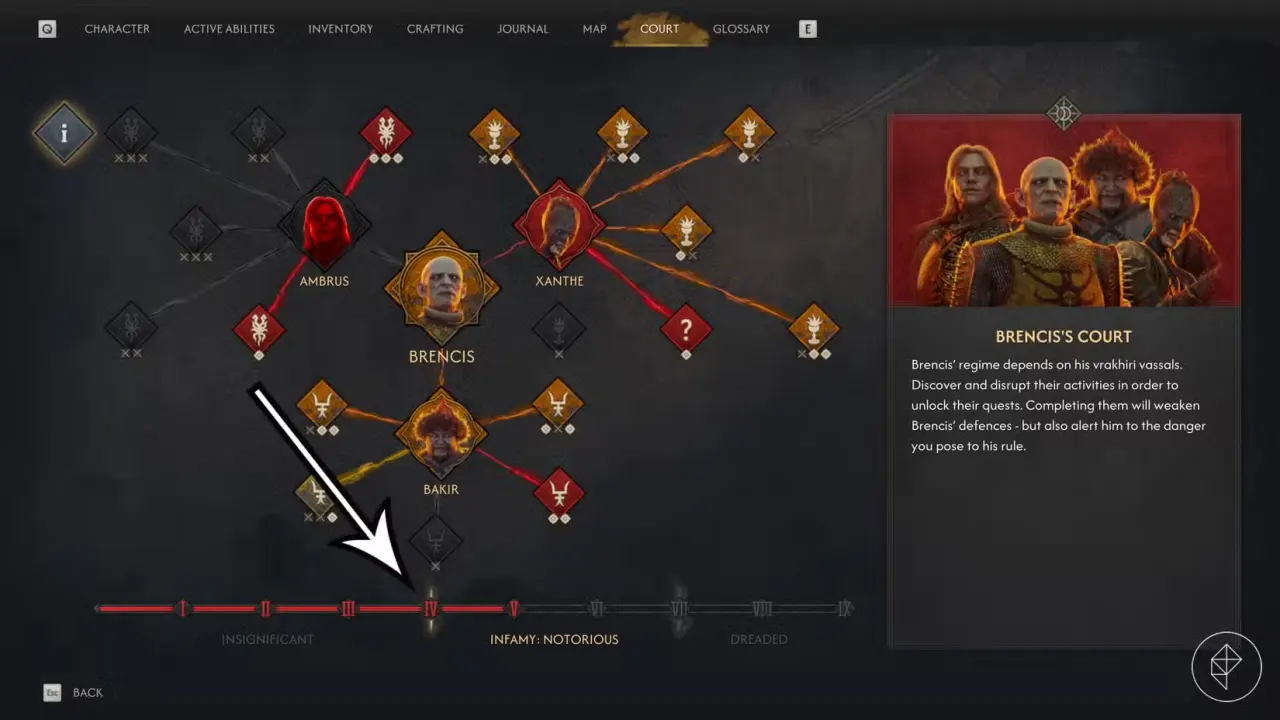
To obtain "A Bulwark Against Darkness" in The Blood of Dawnwalker, you must reach infamy level 4 (level IV), and thus become "notorious." Open the court menu and check the bar at the bottom to check your current infamy status. If it's lower than 4, complete the sabotage missions linked to the three boyars to boost it.
Now that you've become notorious, an anonymous benefactor will send you a mysterious letter. Either a courier will deliver the mysterious letter on your next daytime visit to Svartrau City, or Anca will give it to you on your next visit to the Crossroads Inn. Read the letter to start "A Bulwark Against Darkness."
Besides the mysterious letter, be sure to read the enclosed "List of armor components" too, which discloses the four resources needed to craft a legendary Arbiter Armor set: A relic of a saint, the moult of a large lizard, a bundle of silk threads, and a flask of quicksilver.
Here's an overview of the next steps. You're free to collect the components (steps one to four) in any order you like, though we've listed them (roughly) in order of difficulty and progression.
- Obtain the relic of a saint.
- Obtain the moult of a large lizard.
- Obtain the flask of quicksilver.
- Obtain the bundle of silk threads.
- Find the Uriashi blacksmith and forge the Arbiter Armor set.
How to find a relic of a saint in 'A Bulwark Against Darkness'
A relic of a saint is arguably the easiest item to find, as most objects with "Saint" or "St." in its name will suffice. After a few hours of playtime, you're likely to have at least one of these in your inventory. However, keep in mind that you must sacrifice the relic, so it's best to pick a disposable one.
Here's a list of items you can use, ranked in order of recommendation:
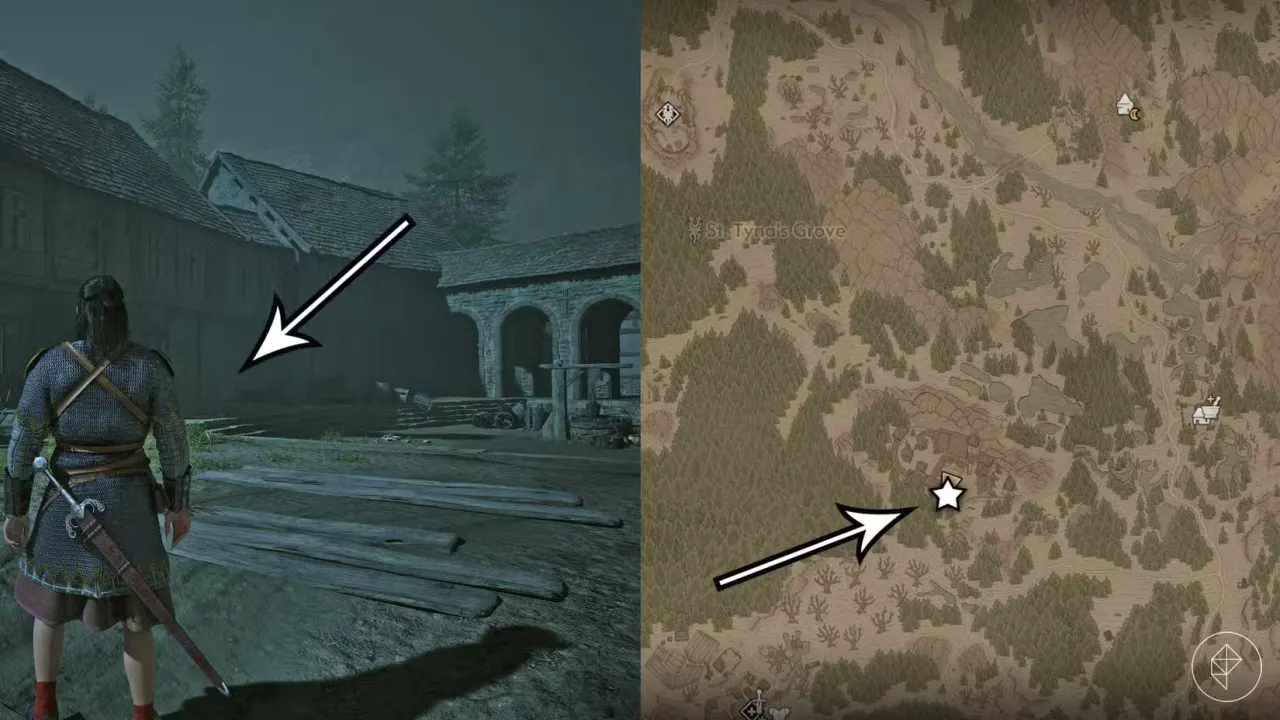
- Saint's Tibia: Pick it up during or after the "Echoes of Silenced Bells" quest. It's in St. Tyna's convent, found on a body on the south side of the courtyard (the lane between the infirmary and the library). It has no other use and little monetary value, making it the best relic to sacrifice.
- The Relic of St. Tyna: This one is also obtained during the "Echoes of Silenced Bells" quest. You're less likely to miss this one, as the soldiers will ask you for it. You can collect the relic from the small building west of the cathedral, but you mustn't give it to the soldiers if you wish to use it for this quest. You can also equip this relic, of course, but you'll get better ones before long, so you might as well sacrifice it.
- The Relic of St. Tobias: You'll find this hand during "The Night of Horrors," one of Lacra's quests. It doesn't seem to have any other use, but it's more valuable and harder to obtain than Saint's Tibia.
- The Relic of St. Dasius: Sold by Vicho for 5,346 denarii, provided you've unlocked him as a witchcraft merchant during "A Study in Crimson." It's a lot of money to spend on an item you're going to destroy, so best skip this option unless you're swimming in denarii.
If you're going for the recommended relic of a saint, Saint's Tibia, here's where you'll find it:
How to find a moult of a large lizard in 'A Bulwark Against Darkness'
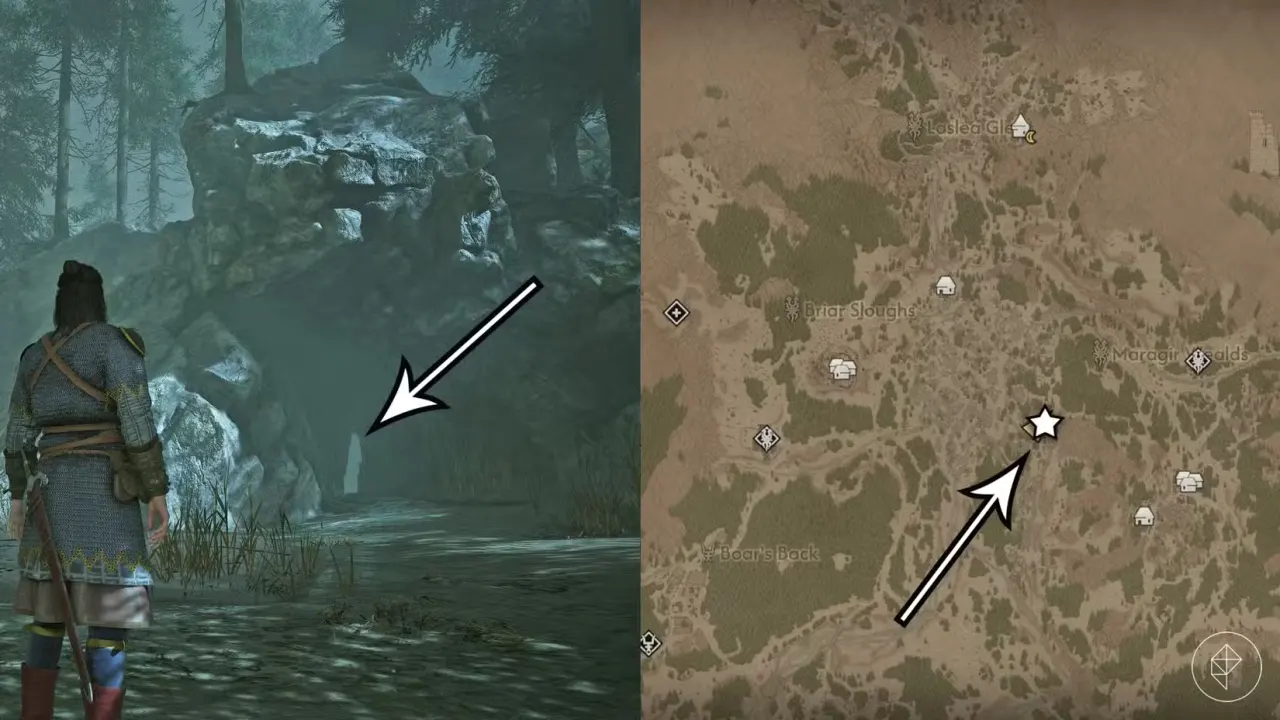
Don't bother killing and looting regular lizards; the large lizard's moult is hidden in a specific location. Travel to the Muddy Trail shrine in the large swamp between the Briar Sloughs and Maragir Wealds regions, and from there, go east until you see a cave entrance. Defeat the tatzelwurms and collect the large lizard's moult at the back of the cave.
If you're following Ambrus' quest line, and accept Iulian Codrin's help, "The Bittersweet Toast" quest may also lead you to this cave. In that case, be sure to follow Vera's trail. If you did the quest but don't have the large lizard's moult, there's a good chance you missed it on your first visit to the cave.
How to find a flask of quicksilver in 'A Bulwark Against Darkness'
You'll find a flask of quicksilver at the top of Silts Tower, aka Aurelius' Tower. The tower stands on the southern edge of The Silts region, southwest of Svartrau City. If you're following Crake's quest line, he'll ask you to investigate the tower during the "Who Pulls the Strings," though it isn't necessary to take this quest. Should "Who Pulls the Strings" be active in your journal, however, the tower shall be guarded by a winged monster, so either be prepared for a fight or sneak in using Shadowstep.
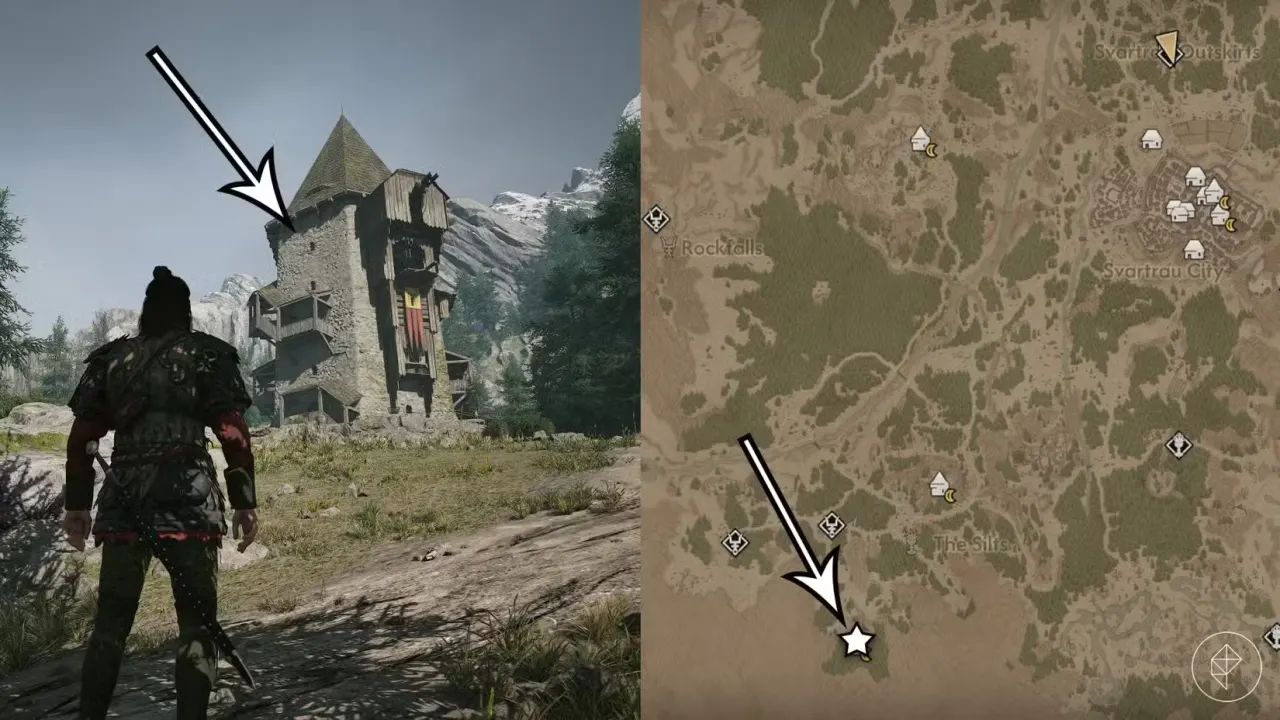
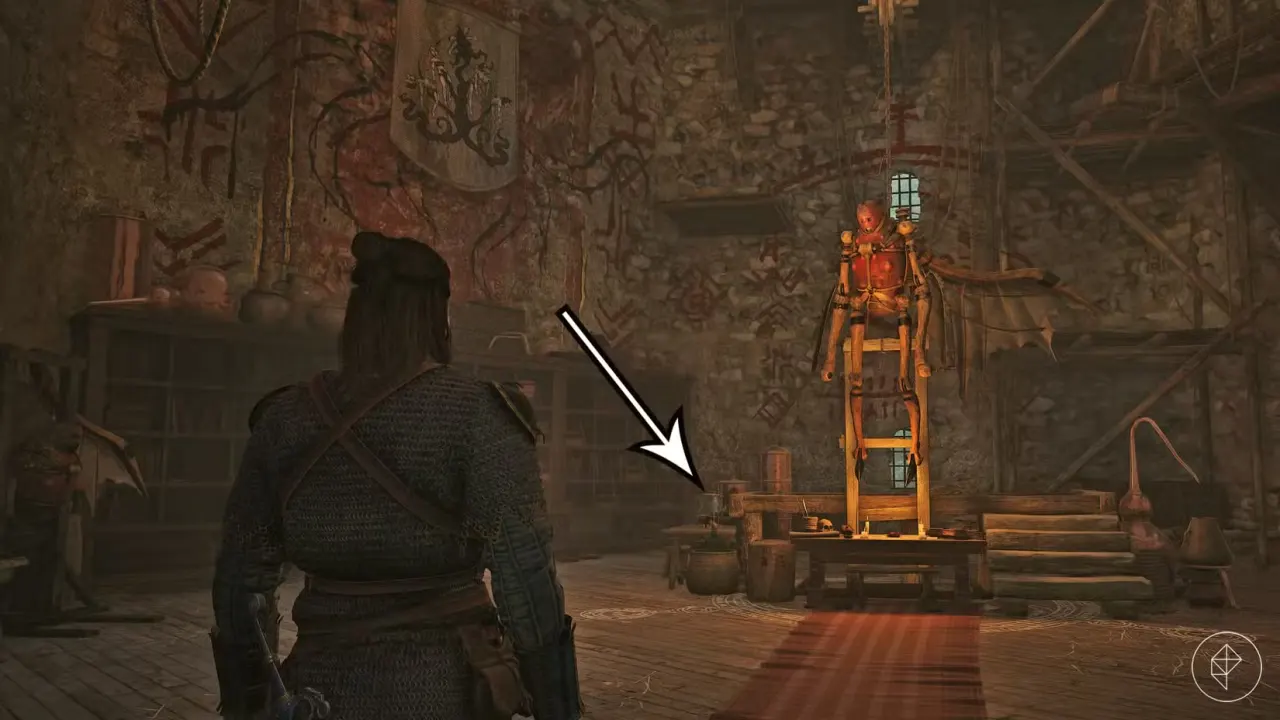
There are a few human soldiers on the second floor and a miniboss (Svetlana, The Dark Prodigy) on the third floor, but you can circumvent the encounter with Shadowstep. Whether you're fighting or climbing your way up, get to the balcony on the fourth floor, east side, and open the door — it's the door that requires four time segments to open.
The "Home Sweet Home" quest will start automatically, teleporting you to some kind of dreamscape. Once you've completed this quest, you can walk back to the fourth floor to collect the flask of quicksilver. It's on the table at the center of the room.
How to find a bundle of silk threads in 'A Bulwark Against Darkness'
Obtaining a bundle of silk threads is the hardest part of "A Bulwark Against Darkness," as you must follow the easily missed Sanzhani quest line for a while. To get started, explore the Svartrau Outskirts and approach the strange, glowing boulder surrounded by red mushrooms. The quest marker won't pop up until you get close enough.
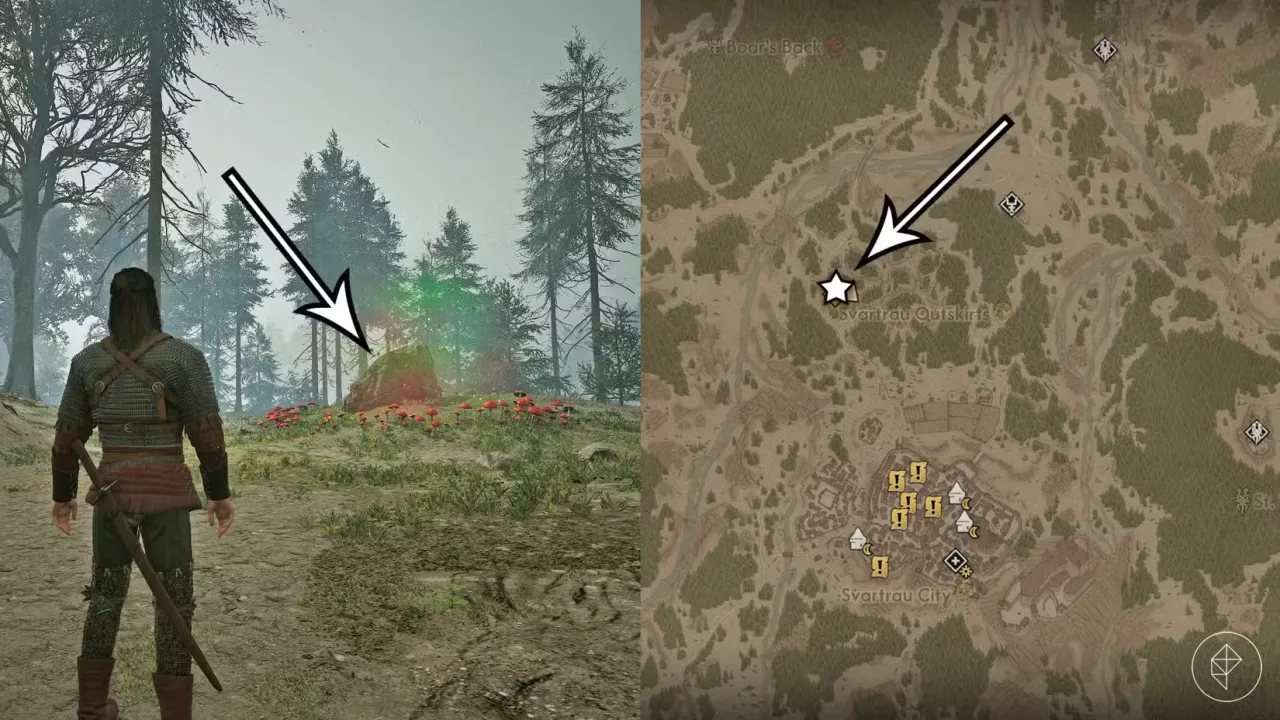
Follow the rings of red mushrooms, explore the burrow, and complete the "Good Home" quest. After speaking with the Sanzhani Tsarina, a new set of small white question marks will pop up on your map. These are new points of interest related to Sanzhani quests.
No need to scour the world for every Sanzhani, though. There are two ways to obtain silk threads; you can either do the "Pearly and Precious" Sanzhani quest (at the Small Bridge shrine in Briar Sloughs) to unlock the Sanzhani trader and buy some silk threads, or you can do the "Come Hither" Sanzhani quest to collect the silk threads for free. The latter will save you a lot of money, so it's best to pick that one. "Come Hither" starts just south of Svartrau City, north of Vedera Marsh Outpost.
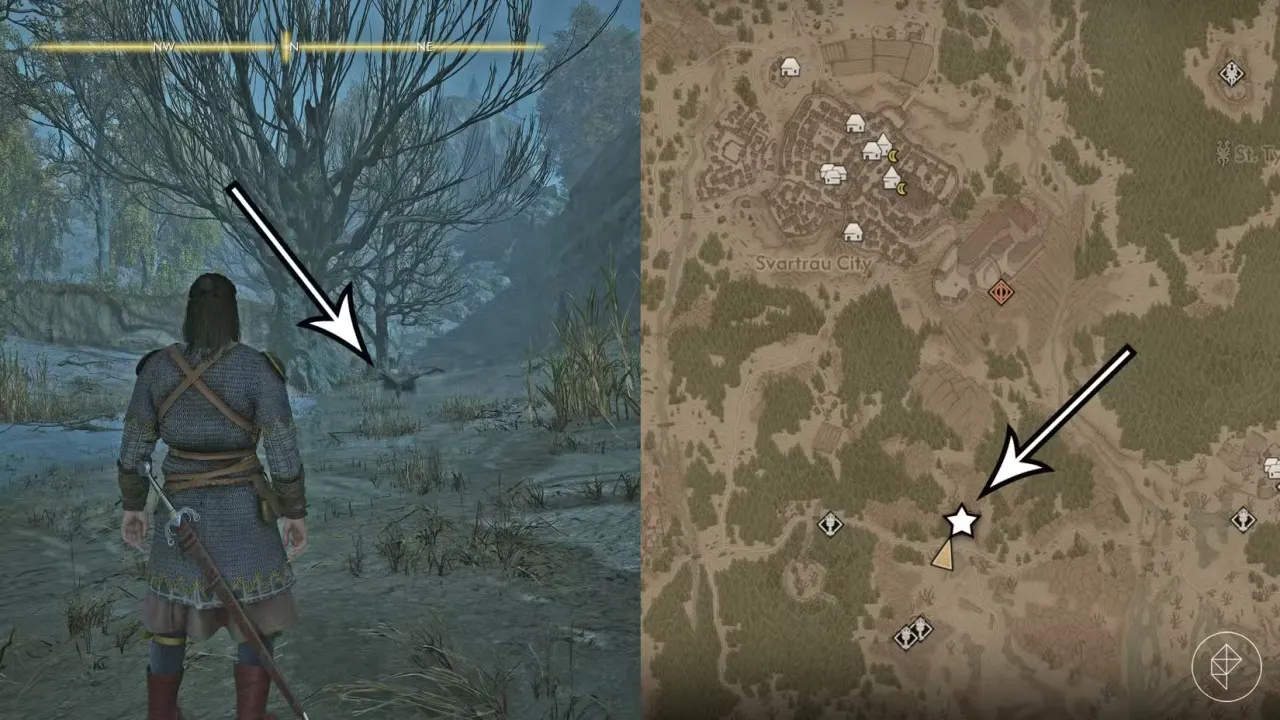
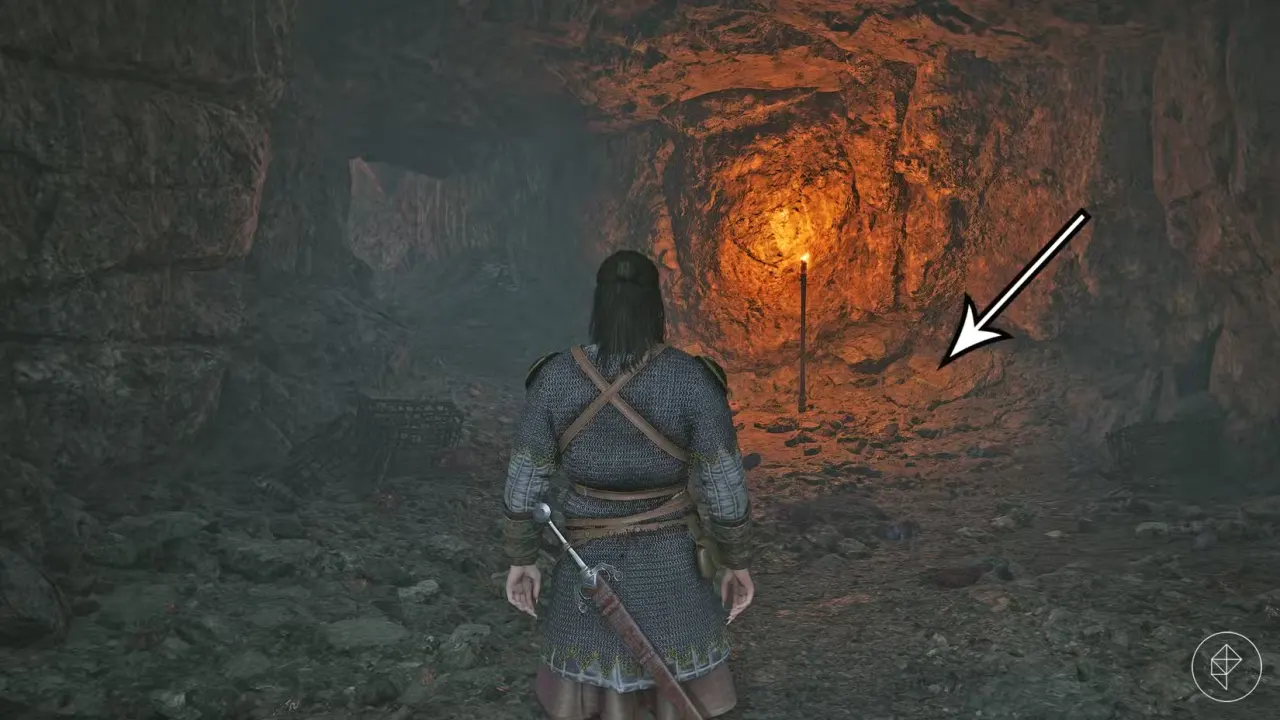
Agree to help the distressed Sanzhani and enter her burrow to defeat a mini-boss called Murohn, Malformed Monstrosity. This takes two time segments. After the fight, collect the bundle of silk threads; it's next to the torch. It's easy to overlook, but if you missed it, just come back to the burrow; it should still be there.
How to forge the Arbiter's Armor in The Blood of Dawnwalker
Once you've collected all four components, visit the Uriashi blacksmith in the northwest corner of the Briar Sloughs region. If you haven't found the Uriashi blacksmith during the "Forge It Anew" quest yet, reading the mysterious letter should mark her location on your map.
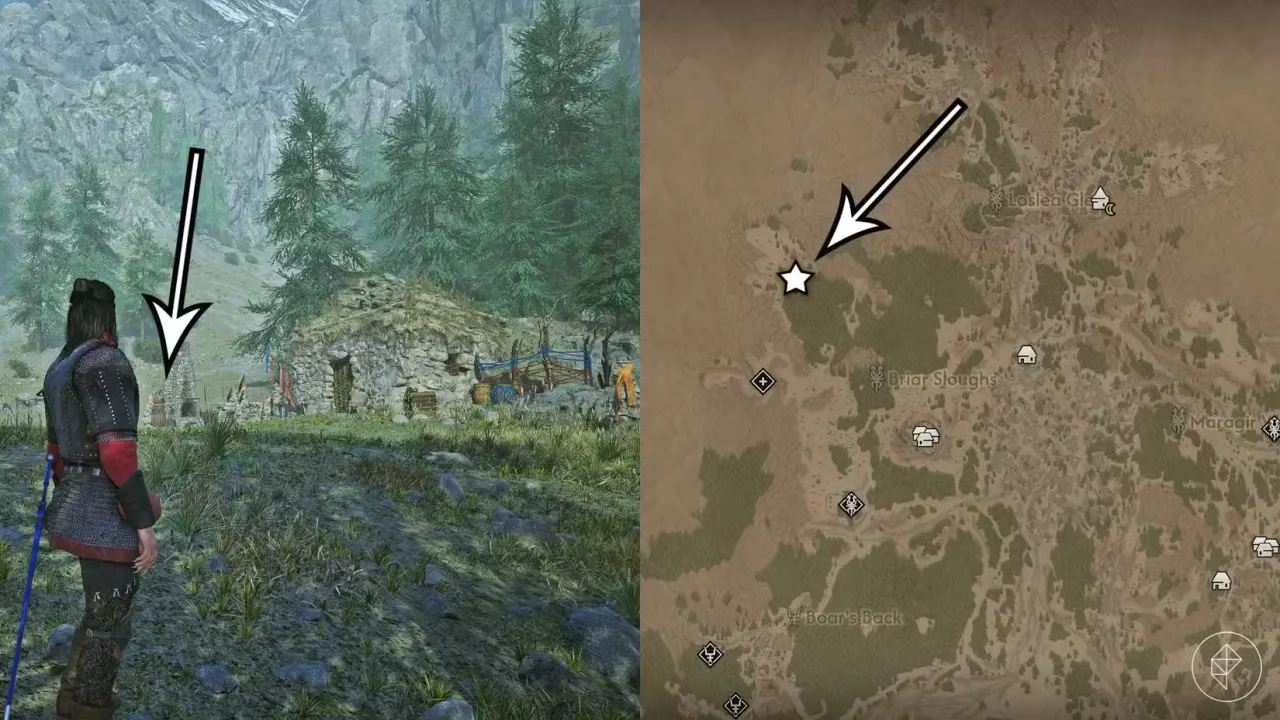
Tell her you've found all the components needed to craft the Arbiter's Armor. Be sure to select the right "relic of a saint" — don't pick the ones you wish to keep! Unfortunately, the Arbiter's Armor requires a binding ritual. Make sure you're prepared for a fight, then speak with the Uriashi blacksmith and tell her you're ready. This will take three time segments.
Once you've defeated the wolves and the ravenous bear, the Arbiter's Armor set will be ready. Conclude your conversation with the Uriashi blacksmith to complete The Blood of Dawnwalker's "A Bulwark Against Darkness" quest, after which you'll find the full legendary armor set in your inventory. Obtaining the Arbiter's set of armor also unlocks the "Arbiter's Regalia" achievement.
The Blood of Dawnwalker is a time-sensitive, narrative RPG where your actions and decisions matter. If you're just starting out, check out our beginner's guide and our recommended quests to do before mass. After the prologue, you're free to explore Vale Sangora and take on Brencis' boyars however you please, but the freedom can be a bit overwhelming. To help, here's what we recommend doing after the prologue.